使用 Arduino 內建的範例程式
Arduino IDE 內有內建一些基礎的範例程式,這些程式可以幫助初學者快速的進入狀況,其中初學者最常使用的不外乎是 Blink 範例的,這個範例很簡單,可以讓 LED_BUILTIN 每間隔一秒亮滅(LED_BUILTIN 在每個開發版中不竟相同,Uno 版為 13 腳位)
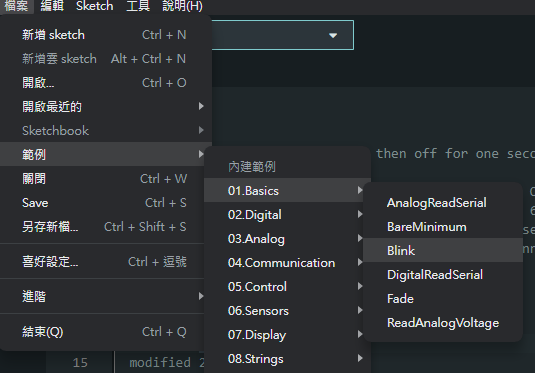
點開上面的範例後,我們們可以看到底下已經出現了以下內容:
/*
  Blink

  Turns an LED on for one second, then off for one second, repeatedly.

  Most Arduinos have an on-board LED you can control. On the UNO, MEGA and ZERO
  it is attached to digital pin 13, on MKR1000 on pin 6. LED_BUILTIN is set to
  the correct LED pin independent of which board is used.
  If you want to know what pin the on-board LED is connected to on your Arduino
  model, check the Technical Specs of your board at:
  https://www.arduino.cc/en/Main/Products

  modified 8 May 2014
  by Scott Fitzgerald
  modified 2 Sep 2016
  by Arturo Guadalupi
  modified 8 Sep 2016
  by Colby Newman

  This example code is in the public domain.

  https://www.arduino.cc/en/Tutorial/BuiltInExamples/Blink
*/

// the setup function runs once when you press reset or power the board
void setup() {
  // initialize digital pin LED_BUILTIN as an output.
  pinMode(LED_BUILTIN, OUTPUT);
}

// the loop function runs over and over again forever
void loop() {
  // turn the LED on (HIGH is the voltage level)
  digitalWrite(LED_BUILTIN, HIGH);
  delay(1000);                     // wait for a second
  digitalWrite(LED_BUILTIN, LOW);  // turn the LED off by making the voltage LOW
  delay(1000);                     // wait for a second
}
如果你有一定的英文基礎,可以是這看看上面的註解,註解上大致描述了該程式的功能及運作邏輯。註解的功能就是這樣,能夠提醒其他開發者或者自己這邊所寫的功能是甚麼。接下來我們將該串程式燒入(上傳)到 Arduino 開發版上看看效果。
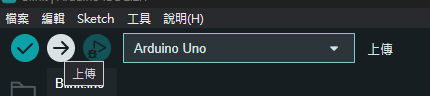
點選左上角的 上傳 按鈕,這樣程式就會進行編譯在上傳至開發版上。上傳完畢後我們可以看到 Arduino Uno 版上有一個 LED 燈在以 1 秒個間隔亮/滅。
Blink 原理解說
那麼這段程式是如何完成以下工作的呢?其實很簡單,我們可以看到有當前有兩個函數(function)在程式中,一個是 void setup() 另一個是 void loop() 其中 void setup() 是初始化,它會在 IC 開啟時執行,而 void loop() 會持續運行。如果拆解成單組可等同於: (以下程式僅為示義)
/* 初始化程式 */

while (true) {
  /* loop 程式 */
}
看完函數後,我們再來看看函數內有什麼? setup 函數中裡面呼叫了 pinMode(LED_BUILTIN, OUTPUT);,pinMode 又是甚麼?
pinMode -> 腳位模式 輸入及輸出
void pinMode(uint8_t pin, uint8_t mode)pinMode 中文翻譯為 腳位模式,顧名思義這個函數和腳位的模式有關,這個函數有兩個參數可以設定 pin(腳位) 和 mode(模式),其中常見的腳位模式有可分為:
INPUT[0x0]: 設定腳位能夠接收輸入訊號OUTPUT[0x1]: 設定讓這個腳位能夠輸出訊號INPUT_PULL[0x2]: 上拉輸入
下圖為 Arduino 內的模式宣告。

digitalWrite -> 數位寫入(設定腳位狀態)
void digitalWrite(uint8_t pin, uint8_t val)如果剛剛在 pinMode 時設定了 OUTPUT,那麼我們就可以使用 digitalWrite 來設定腳位的輸出(狀態),digital 是數位的意思在這邊指的是 HIGH(高電位) 和 LOW(低電位)。
我們可以理解這個函數的功能就是設定 pin 輸出 val 的值,其中 val 為 HIGH 或是 LOW。
delay -> 延遲
void delay(unsigned long ms)delay(延遲) 顧名思義只要使用了這個函數他就會停止現在手上的工作直到延遲結束,這個函數有一個叫做 ms 的參數可以設定,ms 其實就是毫秒也就是說我們可以設定使他停止手上工作幾毫秒。
Blink 小考
回到程式,由你來說說這是甚麼八~~
LED_BUILTIN這個指的其實就是 Uno 板的 13 腳位 (其它版上的LED_BUILTIN可能不盡相同)
void setup() {
  // initialize digital pin LED_BUILTIN as an output.
  pinMode(LED_BUILTIN, OUTPUT);
}
void loop() {
// turn the LED on (HIGH is the voltage level)
digitalWrite(LED_BUILTIN, HIGH);
delay(1000); // wait for a second
digitalWrite(LED_BUILTIN, LOW); // turn the LED off by making the voltage LOW
delay(1000); // wait for a second
}解答
setup > pinMode
void setup() {
// initialize digital pin LED_BUILTIN as an output.
pinMode(LED_BUILTIN, OUTPUT);
}在剛剛的解說中,我們可以知道 pinMode 有這兩個參數,分別可以設定可以設定 pin(腳位) 和 mode(模式),這邊的腳位給的是 LED_BUILTIN,LED_BUILTIN 指的又是 13 腳位,而模式給的是 OUTPUT。
也就是說這行的意思就是 > 設定
13腳位為OUTPUT。注意,由於該函數寫在setup中,僅會執行一次
loop
void loop() {
  // turn the LED on (HIGH is the voltage level)
  digitalWrite(LED_BUILTIN, HIGH);
  delay(1000);                     // wait for a second
  digitalWrite(LED_BUILTIN, LOW);  // turn the LED off by making the voltage LOW
  delay(1000);                     // wait for a second
}在剛剛的解說中,我們可以知道 digitalWrite 可以來設定腳位的輸出(狀態),這邊腳位給的是 LED_BUILTIN 後面分別設定成高電位及低電位。 在剛剛的解說中,我們可以知道 delay 可以來設定延遲,這便給的都是 1000ms 也就是一秒,拆解後可得:
- 設定腳位為高電位
- 延遲 1000ms (1秒)
- 設定腳位為低電位
- 延遲 1000ms (1秒)